Showing posts with label tarts. Show all posts

Jun 29, 2014

Banoffee Pie in a Sour Cream Pastry Crust with Espresso Whipped Cream


I'm not sure what mountain of buttercream I've been hiding under for the majority of my life, but how I've never come to make Banoffee Pie before is just ludicrous.

Ok, America...you too. Let's be honest. I didn't even know about Banoffee until I moved to Dubai...it's almost a bit embarrassing to admit really. Ok to be fair, it is a traditional classic British pie, so it's not our fault. But how-oh-how is this not part of our Thanksgiving lineup, snug and chummy next to the Apple and Pumpkin? Because get ready for this...Banoffee is better than BOTH! AND it's cheaper, the filling only has three ingredients! One of which is sweetened condensed milk, so you know it has to be good.

Never mind...we learn and move on.  Banoffee...it's simple.  Banana + Toffee.  I know, right?  I didn't know what it meant at first either.  Kind of looks like a typo when you first read it.

So let's talk about this sour cream crust.  Hello new BFF.  Is that abbreviation over with yet?  What can I substitute for it?  It's just easy and sums up so much.  Anyway, this crust is soooooo forgiving.  It almost rolls itself AND jumps in your pie plate, you will love it.  I found the recipe on Mel's Kitchen Cafe, lovingly goes into detail about every step.  I suggest you go over to her page and read all about the crust.  No food processor required.  Yay, one less thing to dig out/wash/put away.


Banoffee Pie in a Sour Cream Pastry Crust with Espresso Whipped Cream
makes one single 9-inch pie crust
printable version

Ingredients

For the Crust:
1 1/2 cups unbleached all-purpose flour
1/4 teaspoon salt
2 teaspoons granulated sugar
1/2 teaspoon cinnamon
10 tablespoons butter, frozen
1/2 cup full-fat sour cream, plus an additional tablespoon or two if needed
 
For the Filling:
3 1/2 tablespoons unsalted butter, cut into cubes
1/3 cup brown sugar
1 can sweetened condensed milk
 
For the Espresso Whipped Cream:
3/4 cup heavy whipping cream
1 teaspoon vanilla extract
3 tablespoons sugar
3/4 teaspoon instant espresso powder (not instant coffee granules)
 
Directions

Whisk together the flour, salt, sugar, and cinnamon in a medium sized bowl.
 
 
Using a large cheese grater, grate the butter into the dry ingredients.  I wrapped a piece of plastic wrap around the bottom of the cold butter to help it from slipping out of my hand (take care not to grate it like I did...)

 
Use a fork to lightly coat the butter with the dry ingredients.  Don't mush the butter down, you want to keep lots of chunky pieces to help to create a flaky crust.


Add the sour cream and use fork to incorporate into the butter and flour mixture.  Don't over mix, otherwise the dough will become too tough. 

 
The dough will be slightly shaggy (as Mel perfectly describes it).  At this point, it's best to work it together with your hands.  But don't over-do it.  Just shape it into a cohesive ball.  Kneading too much will result in a tough dough.
 
If you find your dough is too dry, add one small spoonful of sour cream at a time until it comes together (pressing down with the fork after each addition...I had to add about two extra spoonfuls)

 
If baking immediately, the dough is ready to be rolled out (no extra refrigeration time required, I know it's awesome).  If you'll be baking it later on, shape the dough into a disc, cover with plastic wrap and refrigerate 1-2 days.
 
Roll out the dough on a lightly floured surface, making sure to also dust your rolling pin.  Start from the center and roll outward, rotating the dough a quarter-turn after a few rolls with the pin.  Work the dough as little as possible to ensure a flaky crust.

 
I usually place my pie plate over my rolled dough to ensure large enough for my plate; also check to see if there is enough dough around the perimeter to fit up the sides of the plate.

 
Carefully roll the dough onto the rolling pin (dust with flour before hand) and un-roll onto the pie plate. 


Using kitchen shears, trim the excess dough around the perimeter of the pie, leaving about 1/4 inch.

 
Fold the cut overhang underneath and crimp the sides of the dough all around the pie.


Cover pie with plastic wrap and refrigerate for 30 minutes before baking.  Preheat oven to 350 degrees F.  Remove pie from fridge and cover with baking paper.  Fill with dried beans or pie weights.  Bake for 20-25 minutes.  Remove from oven and carefully remove the weights or beans and discard paper.  Place back in the oven for 10-12 minutes, until golden.

 
Let crust cool completely on wire rack before filling.
 
 
To prepare the filling, combine the butter, sugar, and sweetened condensed milk in a saucepan.  Over low heat, bring mixture to a slow simmer, but do not boil.  Cook for 10-12 minutes or until mixture thickens.


Immediately pour the thickened filling into the cooled pie crust.  Smooth evenly with a spatula.  Refrigerate until firm, about 2 hours, or until ready to serve.


Once ready to serve, slice bananas and place in a large bowl.  Add the lemon juice and gently stir to coat the bananas. 
 
 
Arrange the sliced bananas in two over-lapping circles around the pie.  I like to leave a gap between the crust and the bananas so the filling shows nicely.
 
 
To prepare the whipped cream, beat the heavy cream on high speed until soft peaks form.  Add the sugar, vanilla, and espresso powder and beat again on high until the mixture becomes thick.


Add a large mound of the whipped in the center of the pie on top of the bananas (but not covering them completely!) dust with cocoa powder and serve immediately.


crust recipe adapted from Mel's Kitchen Cafe
 
pie filling courtesy of Taste
 

Jun 12, 2014

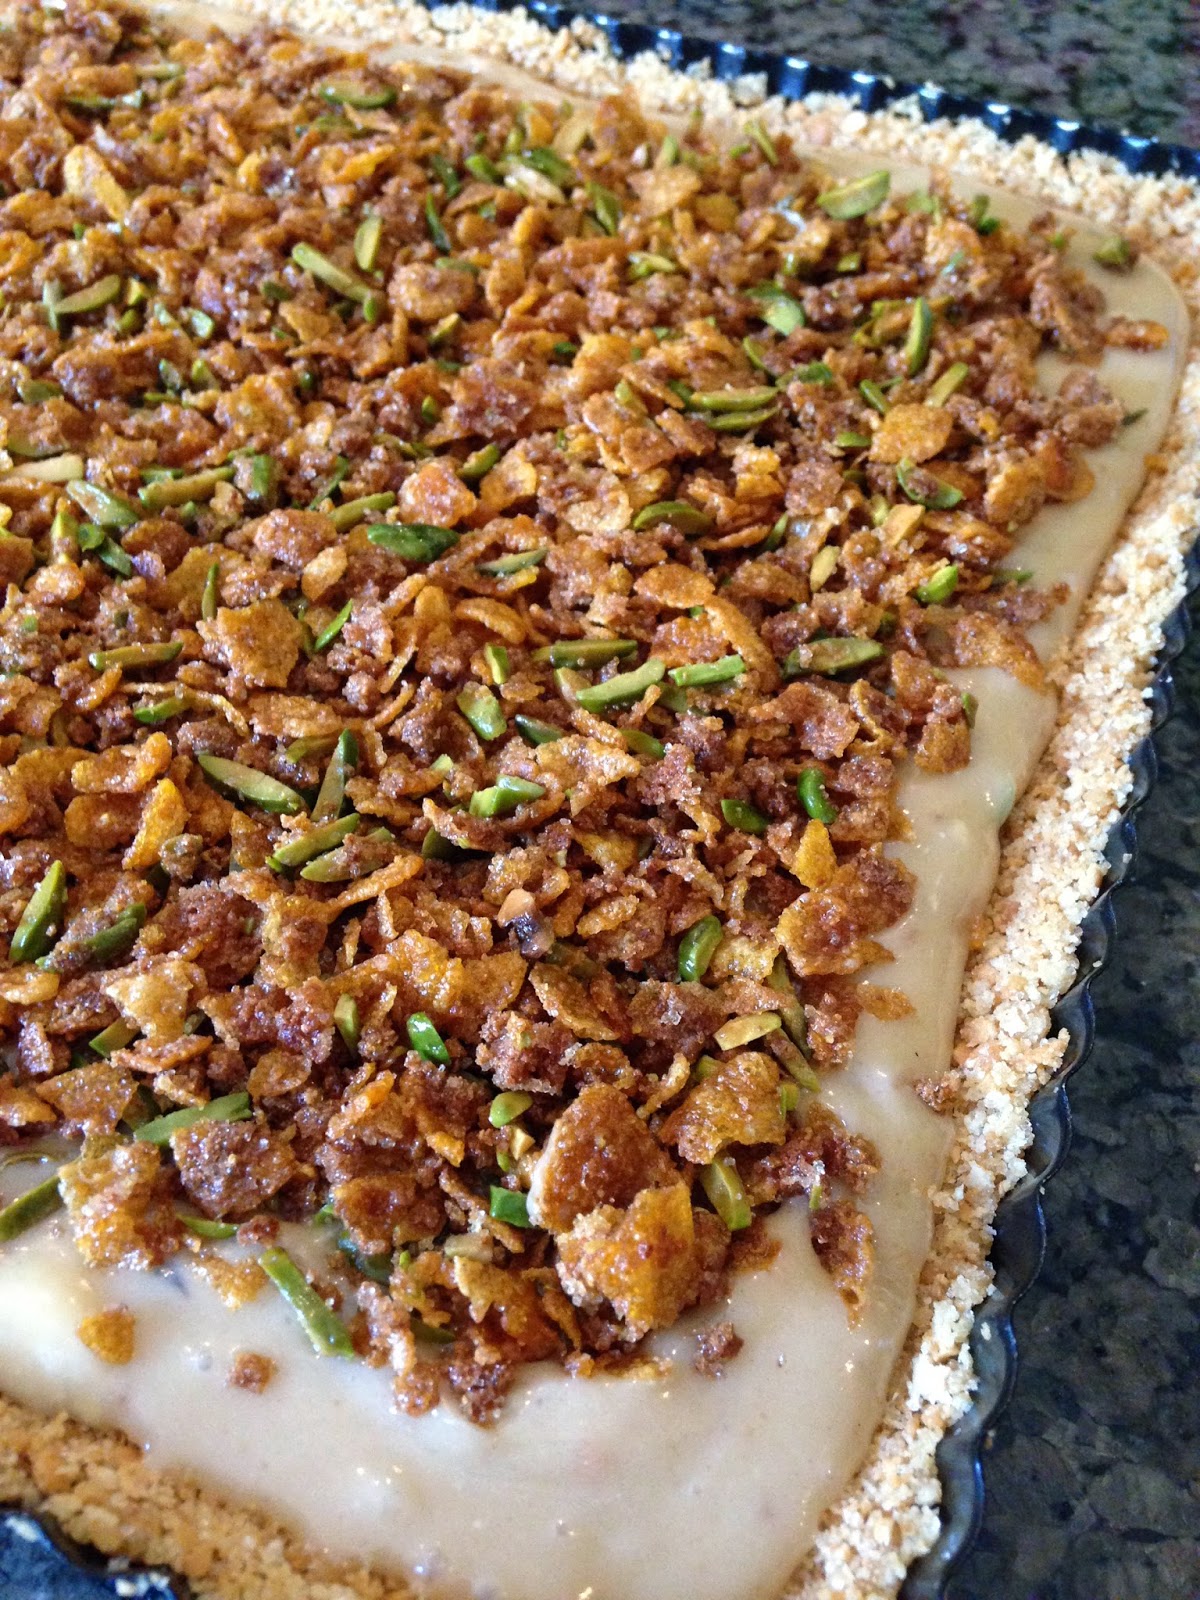
Halawa & Pistachio Tart with Cornflake Cruch


I'm always trying to come up with new ways to incorporate Halawa into desserts (also sometimes called Halva).  I feel it has such huge potential, yet is completely underated (and under-used in desserts).  The first time I wanted to bake with it I couldn't even find a recipe that calls for it as an ingredient (now there are loads...on my recipe page!)  

 
The first time I came across halawa in the grocery store I asked my husband how it was inteded to be eaten...he shrugged and said as a kid they ate it on bread (he's Lebanese).  This peaked my interest (and recipe radar) so it's like the Arab version of Nutella, I squealed?!   Yes, Halawa is Nutella's Arab cousin, awesome.  
 
However let's not be too quick to generalize, the Turk's are also big consumers of Halawa (although they refer to it as Halva) as are people in east and central Europe, central and west Asia, and the Jewish world too...now that the UN is happy, let's discuss Halawa.


Halawa is basically sweetened tahinni, aka sesame paste which is also one of the main ingredients in hummus.  The paste is mixed with a simple syrup and cooked to a hard crack stage, similar to making a caramel.  Halawa is most often sold in blocks or comes sealed in tubs.  Traditionally pistachio's or pine nuts are mixed in with halawa, however my favorite flavor is the chocolate swirl, I mean come on look at that.....


Halawa melts quite easily and can be incorporated into desserts in a multitude of ways.  Add melted halawa to cake batter or buttercream, sprinkle it over a cake,  or swirl into some home made ice cream, really the possibilities are endless.  Leftovers can be stored in an air-tight container at room temperature for about a month or so.  You may see some of the oil begin to separate, just give it a stir and it's ready to go. 
 
I would love to hear how you grew up eating halawa, please leave me a note in the comments below.
 
Halawa & Pistachio Tart with Cornflake Cruch
makes one 9-inch tart
 

For the crust:

1 1/2 cups crushed graham cracker crumbs

2 tablespoons sugar

6 tablespoons (3 ounces) unsalted butter, melted

1/8 teaspoon salt

For the filling:
1 cup pistachio halawa
½ cup sweetened condensed milk
¼ cup corn syrup
2 tablespoons rose water
2 tablespoons sugar 

For the corn flake crunch:
1 ½ cups cornflakes
¼ cup slivered raw pistachios
1 ½ tablespoons sugar
¼ teaspoon salt
1/8 cup milk powder
2 ½ tablespoons melted butter
 
Directions
 

First prepare the cornflake crunch which will be used as the garnish/topping.  This can be made ahead of time and kept in an air-tight container at room temperature for a couple of days.

Preheat oven to 275F.  Line a large cookie sheet with baking paper or a slip mat.  Place the cereal in a large bowl and gently crush to about half the original size using your fingers.

Add the pistachios, sugar, salt, and milk powder to the cereal; toss to combine.


Pour the melted butter over the mixture and stir to form small clusters. 


Spread the mixture evenly on pan and bake for about 20 minutes or until golden brown.  Remove from oven and place pan on wire rack to cool completely.
 
To prepare the crust, combine the graham cracker crumbs, sugar, and salt in a medium sized bowl. *(as you can see I substituted butter biscuits as I didn't have any graham crackers on hand.  Measurements remain the same)
*Note: if you don't feel like digging out the food processor with it's one million attachments (like me) simply place the graham cracker crumbs (or biscuits) in a zip lock bag (release the extra air inside) and crush with a rolling pin.
 
Pour melted butter over the mixture and use a fork to combine, gently pressing the crumbs together making sure they are evenly coated with the butter.  The mixture should resemble wet sand. 


Transfer the mixture to a pie pan and press firmly into the bottom and sides of the pan.  Use a metal measuring cup to ensure the sides and bottom are packed well.  This also helps to create an even surface.

 
Place pan in the freezer to firm, about 30-45 minutes.   Once the crust is firm, proceed to preparing the filling.  Additionally, ensure the cornflake crunch is ready to go as you will need to sprinkle it immediately after pouring the filling so it will stick to the top (as it hardens quite quickly.

I used an 8 inch pan although recipe calls for a 9 inch...used the extra crumbs to make a separate single tart...for myself...of course.

To prepare the filling, combine the halawa, sweetened condensed milk, corn syrup, and sugar in a medium sized saucepan.   
 
Cook on medium heat until mixture is melted, stirring often as to not let the milk burn.


Remove from heat and add rose water. Stir to combine.

 
Immediately pour halawa mixture into the prepared crust.  Use the back of a spatula to smooth the top. 


Before the halawa filling sets, sprinkle the cornflake crunch over the top while still soft.  Refrigerate until set, about 2 hours.  Serve cold and keep any leftovers refrigerated.
 
 
Cornflake crunch adapted from ‘Momofuku Milk Bar’ Cookbook via MarthaStewart


May 30, 2013

Toasted Pistachio & Chocolate Torta


Chocolate and pistachio are one of those magical culinary combinations that taste as if they were destined to be together, BFF's, for example.  The original recipe for this Torta called for almonds, which I'm sure would be excellent as well.  However we recently toasted pistachio's in culinary school and I am telling you, there is nothing, nada, zilch, zero which can be compared to the crunch of a toasted pistachio.  The taste evolves into this deep, roasted, nutty goodness that's just begging to be combined with chocolate.
 
However....oh lordy however...let me tell you one thing.  If you are planning to toast your pistachios, plan on not making any plans for the rest of the afternoon.  I was lucky enough to find shelled pistachios, but still you're only half way there.  First you must remove the skins before they go into the oven.  This is no easy feat and should require loads of patience (at 4 months pregnant AND with a toddler constantly pulling at your leg it's just not something that flows easily these days).  But if you're trying to quit smoking, this is an excellent exercise if you need something to keep your hands busy.  Regardless, it's SO worth the effort I promise.  At least try it once in your life to appreciate how sultry the taste of a roasted pistachio really is.


Toasted Pistachio & Chocolate Torta
makes one 9" torta

 
Ingredients

12 ounces whole pistachios, shelled
1 1/4 cups sugar, divided
8 ounces bittersweet chocolate, coarsely chopped (I used chocolate chips)
8 ounces unsalted butter
6 large eggs, separated, at room temperature
2 tablespoons Frangelico
 
Cocoa powder, for sprinkling

Directions:

Preheat oven to 325 degrees Fahrenheit.  To remove the skins from the pistachios, bring a medium sized saucepan filled halfway with water to a boil.  Meanwhile, fill a medium sized bowl with ice water and keep near by.  Once the water comes to a rapid boil, quickly add the shelled pistachios and boil for about 30 seconds.

 
Quickly remove the pistachios from the boiling water using a slotted spoon and place them in the bowl of iced water.

 
Allow them to sit for a few minutes, then again using the slotted spoon, transfer the pistachios to a clean dish towel that is laid flat on the counter.

 
Using the palm of your hand, continually roll over the pistachios.  Do this action several times and the skin will easily slide off (well, most of the time. Some you will have to peel off).

 
Place the de-skinned pistachios in a colander and give them a quick rinse to remove any small remaining pieces of skin.  Shake off excess water.

 
Transfer pistachios to a cookie sheet lined with aluminum foil.  Be sure they're placed in an even layer and not too over crowed.  I used two sheets since they didn't all fit on one. Roast the pistachios for about 10 minutes, stirring halfway through until they've slightly darkened in color.  You should be able to smell their nutty aroma and you'll know they're done.


Meanwhile, maintain oven temperature at 325 degrees Fahrenheit. Grease a 9" round pan with a removable bottom as set aside.

Allow the pistachios cool for about 5 minutes.  Grind the nuts in a food processor in three batches, pulsing each batch with 2 tablespoons of sugar, using 6 tablespoons in all.


Place the chocolate and butter in a heat safe bowl over simmering water and melt together (or in micowave).  Set aside.


Beat the egg yolks in a large bowl with an electric mixer until lemon-colored, about 5 minutes. Gradually beat in 10 tablespoons of the sugar.


Add the chocolate mixture, stirring to mix well.
 
 
Add the ground pistachios and stir to incorporate. Add the 2 tablespoons of Frangelico and stir to combine.
 
 
In a clean metal bowl, beat the egg whites with the remaining 1/4 cup sugar until they form firm peaks.
 
 
In two additions, fold the egg whites into the chocolate mixture.


Pour the batter into the prepared cake pan and smooth the top. Put the pan on a cookie sheet and bake for 1 1/2 hours or until a toothpick inserted in the center comes out clean.

 
Let cool in the pan on a wire rack for 15 minutes before removing the sides of the spring form pan, then cool completely. 
 
Dust with cocoa powder and slice.
 
Enjoy!
 

recipe adapted from Alexandra's Kitchen