Apr 22, 2013

2nd Birthday Treats!

If you're a follower of my blog, you may have noticed I have been MIA...I have a very decent alibi...I'm pregnant!

I had a nasty month of morning sickness (hah! what man invented that phrase, it's been all-day long sickness, thank you very much) that sentenced me to lots of downtime with little desire to bake...or even get out of bed for that matter.

But I'm back, and I'm hungry.

Before I get back into the kitchen I want to share a few treats with you that I made for my son's 2nd birthday last week.  There was no way I was going to let his special day go by without making one hell of a birthday cake, regardless of how I felt.

As you may know I pride myself on always sharing with you step-by-step photos of my creations, but I'm sorry lovely readers I just didn't have the energy with these ones to post photos along the way (except for the White Trash Monster Mix...that was pretty painless to throw together).  However thankfully I borrowed the recipes from two other amazing mom's and food bloggers who have excellent photos to show you how to get there.

Lemony Funfetti Cake with Vanilla Bean Buttercream

(covered with Smarties that I just could not get to angle properly...I should have just said I let my son decorate it!!!)


Lemony Funfetti Cupcakes (same recipe as the cake) with Marshmallow Buttercream


White Trash Monster Mix (shown lower left)


Ingredients
 
3 1/2 cups Cheerios
6 cups Chocolate Chex cereal (or any combination of your favorite Chex flavors)
16 ounces Plain M&M's
2 cups mini marshmallows
2 cups pretzels, broken into bite sized pieces
2 (11 ounce) packages white chocolate chips *(I used 2 white chocolate bars since I only had one bag of chips)
 
Directions
 
 
Find the largest bowl you have. Like a HUGE one. Mix all of the ingredients together, except for the white chocolate.  

 
Divide the mixture onto cookie sheets lined with waxed paper.  


Melt the white chocolate in the microwave or in a double broiler until smooth and no lumps remain. Melt slowly and stir often to avoid burning. Divide the white chocolate among the three pans, simply pour over and eye-ball the amount for each. 


 I used two spatulas, one in each hand to coat the cereal/candy mixture.

 
Allow to sit at room temperature until the chocolate has solidified again.  Break into pieces and try not to each the entire batch.  This stuff is deadly addictive.  A word of caution however, I stored mine in large zip-lock bags and I found on the second day it was starting to get soft.  Try storing in an air-tight container if you're not eating this right away.  Which is almost next to impossible.
 
I found myself nibbling on this in the mornings...I mean it's cereal, so it's okay. 
 
Recipe Links:
 
Lemony Funfetti Cake (and cupcakes) from Baked Bree
 
Vanilla Bean Buttercream from Glorious Treats
 
Marshmallow Buttercream also from Baked Bree
 
White Trash Monster Mix adapted from Alton Brown 


Mar 24, 2013

Reese's Milk Chocolate Peanut Butter Cup Egg Brownies with Peanut Butter Filling and Hershey's Chocolate Coating


Nothing quite screams Easter like Reese's Peanut Butter Cups.  Especially in the 'egg' form.  The geniuses over at Hershey's release a seasonal version of Reese's Peanut Butter Cup candy at Easter time, the REESE'S Milk Chocolate Peanut Butter Eggs:


It's the exact same components of a Reese's Peanut Butter Cup, Hershey's chocolate outside, sweetened peanut butter filling inside, but in a bite-sized-shove-in-your-mouth-much-faster except for the blasted foil wrapping, egg-form.

Growing up my mom always made home-made chocolate peanut butter eggs at Easter time.  It's such a loving memory for me thinking about her standing in the kitchen dipping all those sticky peanut butter eggs for me and my Dad.  It was always a once-a-year kind of treat that we adoringly looked forward to.  So this year I decided to attempt a brownie version of her peanut butter eggs, but Gina-style...totally over the top and somewhat ridiculous.  But in a fun, fatty way.

Wishing you all a wonderful-peanut-buttery Easter with your families.  God bless and thanks for always supporting my wicked creations. 

Reese's Milk Chocolate Peanut Butter Cup Egg Brownies with Peanut Butter Filling and Hershey's Chocolate Coating
printable version

Ingredients

For the Brownies:
1/2 cup sugar
2 tablespoons unsalted butter
2 tablespoons water
1 1/2 cups chocolate chips
2 large eggs
1/2 teaspoon vanilla
2/3 cup all-purpose flour
1/4 teaspoon baking soda
1/2 teaspoon salt
1 (10 ounce) bag Reese's Milk Chocolate Peanut Butter Eggs, cut in half

For the Peanut Butter Filling:
1 cup creamy peanut butter
4 tablespoons unsalted butter, room temperature
1/4 teaspoon salt
1 cup powdered sugar

For the Chocolate Topping:
9 ounces semi sweet chocolate chips
9 ounces milk chocolate chips
1 tablespoon vegetable shortening

Directions
To prepare the brownies, preheat oven to 350 degrees Fahrenheit (165C). Grease an 8 x 8 square pan. I use a sandwich baggie as a glove to make this step easier.

 
In a medium saucepan, combine sugar, butter, and water. 

 
Cook over medium heat until boiling.

 
Remove from heat and stir in chocolate chips until melted and smooth.

 
Add eggs and vanilla, whisk to combine.
 
 
In another bowl, combine flour, soda, and salt. Whisk to combine.

 
In two additions, add the dry ingredients to the chocolate mixture. Stir until just combined. 

 
Gently fold in the halved peanut butter eggs.


Spread batter into prepared pan and bake for about 25-30 minutes until a toothpick inserted in the middle comes out clean.

 
Transfer to wire rack to cool completely.
 
 
To prepare the peanut butter filling, place the peanut butter, butter, and salt in a microwave safe bowl and heat for one minute until just soft, but not melted completely. 


Stir to combine.


Sift in powdered sugar. Be sure to sift otherwise you run the risk of adding lumps of sugar.


 Stir to combine. 

 
Spread filling evenly over the cooled brownies using an offset spatula.


To prepare the chocolate coating, melt the chocolate and shortening over a double broiler until smooth.


Pour melted chocolate evenly over the peanut butter filling. Chill until solid.


The smell of chocolate and peanut butter cause small children to flock with laser guns so be careful.

 
To serve, let the bars sit at room temperature for about 20 minutes. If you try to cut them straight from the fridge the peanut butter and chocolate layer will separate from the brownie.

Happy Easter and enjoy!
 
 
peanut butter filling and chocolate coating recipe courtesy of Joy of Baking

Mar 13, 2013

White Chocolate & Cointreau Frozen Cheesecake with a Milano Cookie Crust


This is the first recipe, well boozily adapted recipe I'm sharing that I learned in culinary school.  The original didn't include the chocolate or alcohol, I mean really why bother!?  So I've dressed it up and got it ready to party.  My kind of cheesecake.
 
Although the term for this dessert is a frozen cheesecake, don't let that fool you.  This is not a baked cheesecake that is frozen and eaten.  In fact there is no baking required with this dessert, all the ingredients are whipped/mixed/frozen.  This is a creamier, lighter, and almost ice-creamy version of cheesecake.  The texture is extremely delicate and melts instantly in your mouth, really it's something amazing.
 
There is only one problem with this recipe.  The crust calls for 21 milano cookies, which is about 1 and a half bags.  That means you are left with half a bag of milanos in the house.  AND a cheesecake.  All aboard stretchy pants.   
 
White Chocolate & Cointreau Frozen Cheesecake with a Milano Cookie Crust
makes one 9-inch cheesecake
printable version
 
Ingredients
 
For the crust:
1/4 cup (2 ounces) unsalted butter, cut into 1/2-inch pieces
1 1/2 teaspoons instant espresso powder   
 
For the filling:
300 grams cream cheese
2 sheets gelatin (3.5 grams each, 7 grams total)
120 grams sugar
40 ml water
3 egg yolks
600 ml whipping cream
2 teaspoons vanilla extract
200 grams white chocolate
3-4 tablespoons Cointreau 
 
Caramel sauce to drizzle
 
Directions:
 
Pulse the cookies in a food processor until crumbs form (I broke them in half first).
 
 
Pour crumbs into a medium sized bowl, add espresso and melted butter.

 
Mix with a fork (or your fingers) until thoroughly incorporated.


Transfer mixture to a spring form pan and press evenly along the bottom and up the sides.  Use a measuring cup to help even out the crust, this works great especially along the sides.  Keep refrigerated until ready to fill.

 
Soak the gelatin in cold water and set aside.


Whisk the egg yolk until it becomes pale and frothy.  Heat water and sugar in a small saucepan to make a thick syrup.  Pour the syrup onto the whisked egg yolks while continuing to whisk. 

*If you are a bit wary of not directly heating the egg yolks (like me) use an instant thermometer to guarantee the temperature of the egg mixture reaches a safe 165 degrees Fahrenheit (the temperature in which salmonella is killed instantly).  If you find your egg mixture has not reached this point after adding the syrup you can re-heat it over a double broiler until 165 degrees has been reached.

 
Squeeze out the excess water from the soaked gelatin and mix into the egg mixture.  If your mixture is lumpy the gelatin didn't dissolve completely.  Reheat the mixture over a double broiler, whisking until smooth.
 
 
Add the cream cheese and whisk until smooth and creamy.  If you have lumps, don't worry keep whisking, it'll get there.

 
Push the mixture through a fine sieve to remove any bits of cooked egg or undissolved gelatin.

 
Whisk in the Cointreau.

 
Melt the chocolate over a double broiler or in the microwave.  Stir until smooth.  *I accidentally bought white chocolate with almonds, but it still turned out great and either will work.
 
 
Stir the melted chocolate into the cream cheese mixture.
 
 
Whip the cream to almost a medium peak and add vanilla extract.  


 Continue to beat until until you've reached medium peaks.

 
Gently fold the whipped cream into the cream cheese mixture

 
Transfer the mixture on top of the cookie crust and spread evenly.  Freeze for 6-8 hours, or until firm.

 
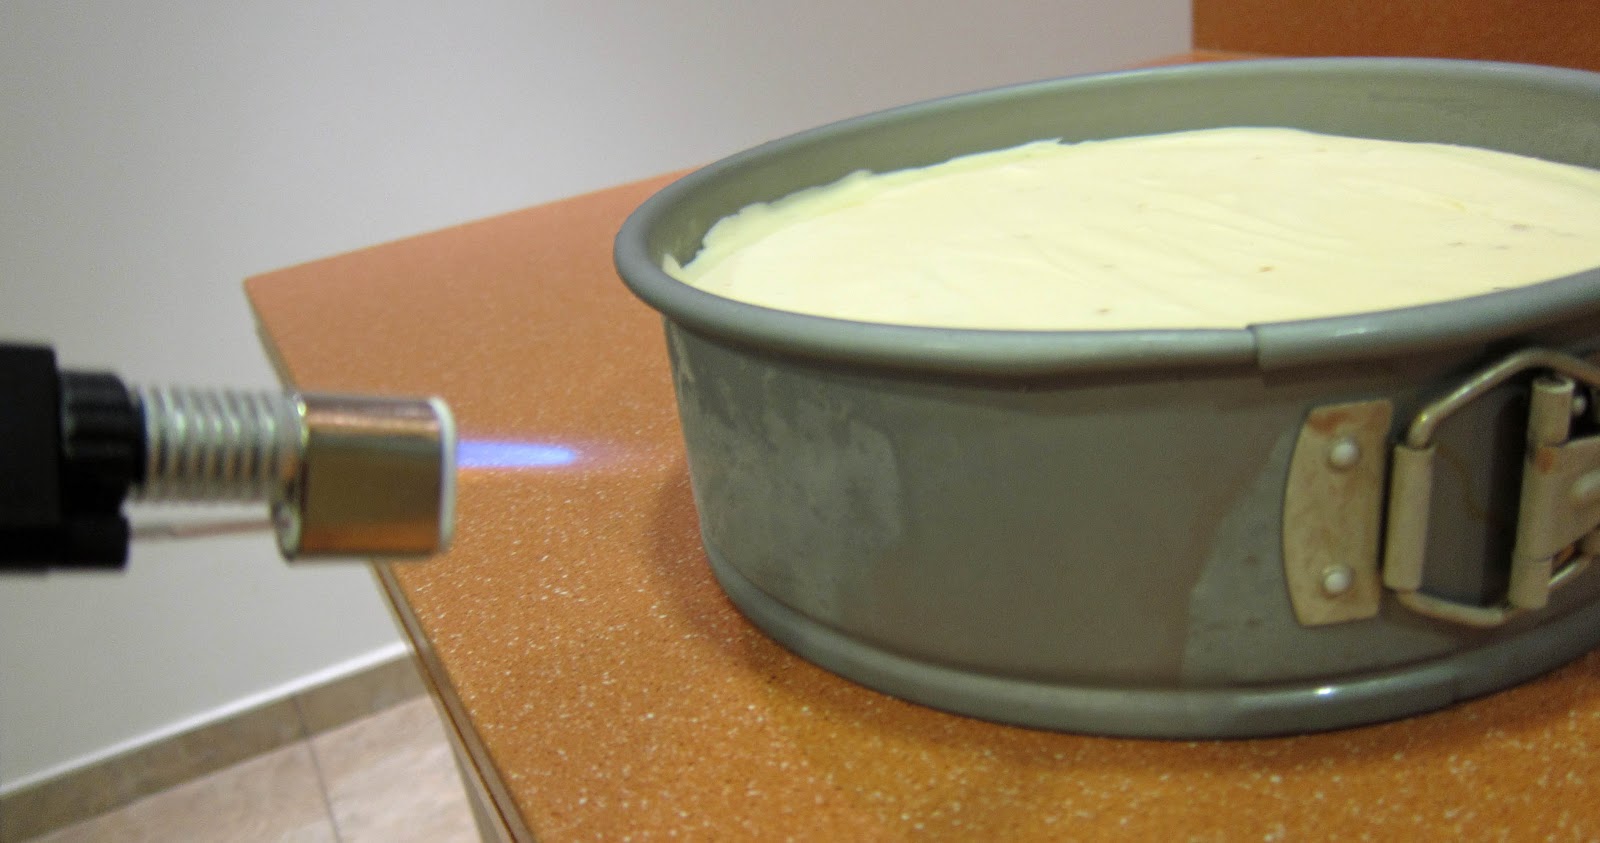
Blow torch time!  To help release the cheesecake, run the torch around the edge of the pan.  Open lock to release (it will release I promise!)

 
Serve frozen.

 
Drizzle with caramel sauce if you wish (I used store bought...shhhh don't tell anyone, okay?) 
 
 
 cookie crust recipe from Epicurious
filling recipe adapted from ICCA