Dec 20, 2011

Perfecting the Sugar Cookie


Every year around this time I curse at myself because I can't find my Christmas cookie cutters.  I go out, buy some new ones and curse even more because I know for sure mine are hiding out somewhere in my baking goodies cabinet.  Then I go back home, stand on a chair to pull out the cookie sheets in the cabinet above the fridge (aka goodie cabinet) and voile, there are the cookie cutters from years before hiding out behind some bundt pan I never used.  Does this sound familiar to you too, or is it just me?  No way I am the only baking hoarder out there.  And every year I decide to try a new recipe because the one from last year wasn't crispy enough, or chewy enough, or flattened too much etc.  I also have this problem with mascara, I am 30 years old and have never found a mascara that I like.  Same goes for pillows.  God I would pay anything to have a decent pillow.  Well, since so far in my life mascara and pillows are out, I thought this is the year I'd master the sugar cookie.

I usually SWEAR by Martha Stewart, but I tried her basic cut-out sugar cookie last year and they got a little puffy.  You know what I'm talking about if you bake sugar cookies often.  You have to be careful how close you lay your snowman down next to Santa, otherwise they can become conjoined twins.  I always wondered how bakeries got their sugar cookie edges so sharp.  They always seem to maintain their shape so well during the baking process, and I was out to find the secret.

After reading through countless cookbooks and websites I opted for a recipe that had neither baking soda or baking powder. That means with the exclusion of both types of leaveners my little candy cane cut-outs should come out of the oven roughly the same size and thickness that they went in. And damn-it they did! They were still chewy, but not puffed up. I was able to bake them pretty close together with NO grouping (aka the conjoined twins bit).

I find it extremely resourceful reading through comments people leave on blogs and cooking websites like allrecipes.com because typically if there is an error in a recipe, many people will make the same comments about it. This is great at giving you a heads up on what to prepare for.  Out of all the comments I read with regards to sugar cookie recipes, I noticed one in particular kept popping up.  People continually mentioned that the easiest way to transfer the cut out cookie to the sheet pan was to first roll the dough onto waxed paper, cut your shapes out, remove the excess dough (to be reused of course) and then to transfer the waxed paper with your cut-outs directly to the pan.  Seems like such a small step but trust me it makes a huge difference, especially when you've got delicate shapes or your dough has warmed up a bit too much and is beginning to get sticky.  How many times have we all had to try and re-shape Santa after pulling him off the counter?  I know he's lost an arm or two over the years in my kitchen.   

And since I was on such a roll I said to myself, this will also be the first year you glaze them with royal icing.  Usually I wimp out with the decorating and simply throw some colored sugar on the cookies prior to baking.  This is how my Grandma always made them, so maybe I've been using this as my excuse for all these years.  But really, nothing is better than an iced sugar cookie.  Especially that first bite when you sink your teeth into the frosting that's so thick and laden with sugar it makes your taste buds do the Macarena, oh that's good.

I'll admit though, I only frosted about one batch.  Two reasons.  One, okay I was nervous and didn't want to screw them ALL up in case I didn't get the frosting right the first time.  Second, I'm flying these precious, delicate little babies all the way to the US, and there is no way the icing would make the trip.  I can barely make that trip.  Plus, my husband is going to kill me when I tell him we have to hand carry all these flippin' cookies I've been baking this week (more posts to come).  Yes, like our 22lb. child isn't enough. 

Here are some additional tips that I found to be extremely useful:

Separate your dough into baseball size portions.  This makes it easier to roll out (especially when rolling on waxed paper).  It also prevents the dough from cooling off too much.  This means it will stick less to the rolling pin and in turn you'll need less flour.  Dusting the dough/counter with too much flour during this stage can cause your cookies to become dense and brittle, and who wants to bite that.


As I mentioned before, roll onto waved paper instead of directly onto the counter.  However I found it was much easier to first spray the counter with non-stick cooking spray.  This gives the waxed paper something to grab on to.  Otherwise it will be dancing all over the place and it is no help at all.


If your recipe calls for baking powder or baking soda and you find that they tend to lose they shape in the oven, first put the pan in the freezer with the cookies already on it for about an hour so until they firm up.  If your dough goes into the oven quite cold you'll have less spreading.  On a side note, I always keep my cookie dough in the fridge for pretty much all cookie recipes for this exact reason, especially in between batches.

1/8" to 1/4" rolled thickness is perfect for recipes with no leavening agents.  You can pretty much guarantee that whatever height and shape you put them in the oven they'll be about the same coming out.

Rotate your sheets 180 degrees halfway through the baking time for even color and to prevent over-browning the edges.  Although, I think that's usually the best part.

If your cookies start to dry out after you've stored them (preferably in a metal tin with a piece of waxed paper under the lid or an air-tight container) add a piece of bread.  The moisture from the bread is absorbed by the cookies making them soft and chewy again.

Always try to bake on waxed paper.  This not only helps the cookies from over-browning but you also won't need to grease the pan.  Additionally I find that it helps with clean-up in between batches.  If you are dusting your cookies with colored sugar, the excess sugar that falls onto the pan (and not your cookie) can get caked onto the pan while baking.  Then when you're ready to bake the next batch you'll have to scrub the pan clean before you can start with another dozen.  Waxed paper solves this as you can just toss it in the trash and start clean with a new piece.

Christmas Sugar Cookies

2 1/4 cups bleached all-purpose flour
1/4 teaspoon salt
3/4 cup sugar
1 1/2 sticks (6 ounces) unsalted butter, cut into pieces
1 large egg
2 teaspoons finely grated lemon zest (optional)
1 teaspoon pure vanilla extract
colored sugar for sprinkling

In a small bowl, whisk the flour with the salt. Put the sugar in a food processor and process until very fine. 


Add the pieces of butter and process until the mixture is smooth and creamy.


Add the egg, lemon zest and vanilla and process until smooth.  A microplane works greats to zest the lemon.  Highly recommended for lots of other uses in the kitchen too (nutmeg, cinnamon, cheese).


Add the flour mixture and pulse just until a dough forms.


Divide the dough into baseball size portions and wrap with plastic wrap. Chill until firm, about 1 1/2 hours.  Preheat the oven to 350°.  Spray counter with cooking spray and place a sheet of waxed paper on top.  Lightly dust the paper and your rolling pin.  Roll out the dough 1/8 inch thick.  Stamp out shapes, cutting the cookies as close together as possible.


Remove the dough from in between the cut-out cookies.  Roll this back into a ball with your hands, re-wrap with plastic wrap and place back in the fridge to firm up.  You'll re-roll this later to make more cookies.  You'll have to gauge how many times you can re-use the dough.  Every time you roll more flour gets incorporated which can make the cookies tough.  I probably wouldn't use more than twice.


Since the waxed paper will also be going into the oven, I used a pastry brush to remove the excess flour from the sheet.


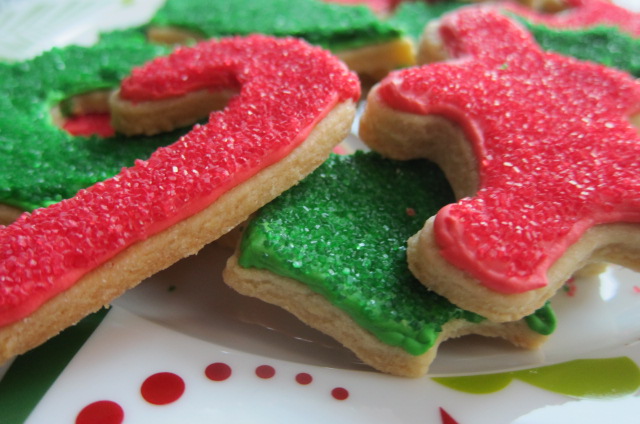
Sprinkle the cookies with colored sugar (unless you plan on frosting them).


Transfer the cookies (along with the waxed paper) to nonstick baking sheets. Bake for 10 to 12 minutes, or until lightly browned around the edges. Transfer the cookies to racks and let cool.


Royal Icing (optional)

2 1/4 cups confectioners' sugar
7 1/2 teaspoons meringue powder
1/4 cup water

Place confectioners' sugar, meringue powder, and water into the bowl of an electric mixer fitted with the whisk attachment; beat on low speed for 10 minutes.


Use immediately, or store in an airtight container up to 2 days (icing hardens quickly when exposed to air). Beat well with a rubber spatula before using.

If you want to add color to the frosting it's best to use food coloring gels.  Gels don't water down your frosting like the old fashioned drops.  Additionally the color is much more concentrated which means you'll achieve a brighter, richer color.

Divide your frosting into separate parts, depending on how many colors you want to make (I only did two).  Have some tooth picks on hand, they are the best tool to use when adding gel.  You'll be surprised at how little you'll actually need.  A little drop will do ya!  


Once you've mixed up the colors get yourself a piping bag with a number two or three tip.  I used one of each and they both worked about the same.  Here is a little trick I learned from a cake decorating class I took a couple years ago.  Get a tall glass as shown below.  Place your piping bag (with tip already in place) inside and fold the top of the bag over the edge of the glass.  This makes the bag extremely easy to fill with the frosting.


First you'll need to pipe the edge.  This creates a border that will hold in the frosting that will be 'flooded' inside.


After you're done with all of the edges let the cookies sit until the border firms up.  Now you'll need to water down your frosting so it becomes more fluid and easier to spread easier.  Add 1 tablespoon of water at a time until you've reached the desired consistency.  Ideally it's best to do this in a bowl and refill your bag.  I completely forgot this step and filled my cookie with the thicker frosting that should have only been used for the border:


When you have the correct consistency the frosting will 'flood' the cookie and will set even and beautiful.  I got it right with the red though:


After you've flooded the cookie, sprinkle them with colored sugar for a bling-bling effect


Let the cookies sit for a few hours to let the frosting harden up before you pack them.  Otherwise things could get really messy.


Sugar Cookie recipe adapted from Food & Wine
Icing recipe courtesy of Martha Stewart


Dec 19, 2011

Buche de Noel gone BAD.

Ever since I met my husband we've had a buche de noel at Christmas.  For him it's a tradition.  His family in Lebanon runs their own bakery and the buche de noel is one of their specialities during the holidays.  I usually pick ours up at ChoCo'a since they are not skimpy on the frosting, which I think is jolly.  Here is ours from last year:


Since this year I've got my own shinny new baking-blog I thought to myself, this is the year you'll bake-da-buche.  You wanted a challenge and this is about at challenging as they get.  So I spent a lot of time getting to know the buche.  I researched different types of cake, what rolls the best, what cracks the least.  Boy I didn't know what I was getting myself into. 

Before I go any further, lets go back to my first blog entry.  Remember I was so excited to share all my success and failures with  you?!  Yep I said I'd show all my muck-up's to help teach us what to do and what NOT to do?  Well, dear friends, here is my 'oh f*** what happened' cake.

Really I shouldn't be too hard on myself.  The buche I made tasted like heaven.  Probably one of the most decadent and dreamy desserts I've prepared in quite a while.  Although it just looked like...well, it looked like it got ran over by the ugly bus.  It's okay though, really.  It's okay because I know where I went wrong.  I actually knew the second it went wrong but I kept chugging along anyway.  I decided I would just smother it in chocolate.  Ganache is like band aids, it can fix anything. 

So let me back up and explain a bit about the recipe I choose.  I decided to go with a cake that didn't have any flour in the recipe.  After reading up on different blogs and baking websites, most people agreed that when you roll a cake made with flour as an ingredient, it can crack easily, especially if you over bake it. Also, once you pour the batter into the sheet pan, it's only reaches about three-quarters to one inch high.  Since it has such a minimal height, dryness can also occur causing those ugly cracks.  So instead of a cake whose structure is dependant on flour, I opted for one that used stiffened egg whites for the body.
 
Oh the temperamental egg white.  So moody and vulnerable.  And me with my fancy-shamcy Kitchen Aid mixer whose whip attachment must reach 100mph, we were just doomed.  The recipe called for 'stiff peaks' and I ended up with scrambled egg whites.  When you over-whip egg whites they tend to get pissed and the proteins start to break down and you're left with chunky, almost curdled looking eggs.  After the fact I read somewhere that you can try to add another egg white to correct the problem, but it was too late for me. 
 
Nevertheless, I kept on with the recipe.  Mainly because I had hope.  Also because my husband aka the photographer had the day off and he was helping me out...no chance I could have managed baking the buche, taking the pictures, AND chasing after our little 8 month old son who just started crawling the day before. 
 
I do urge you to try this recipe, the original received RAVE reviews.  I swapped out the basic whipped cream for a mocha version and also added a ganache on top.  We were still able to eat mine, it just wiggled a lot more than it's supposed to.  
 
If you give it a go, please let me know how yours turned out! 

Buche de Noel

Cake:
6 ounces semisweet bittersweet chocolate, chopped or 1 cup semi- or bittersweet chocolate chips
3 tablespoons water or strong coffee
6 large eggs, at room temperature, separated
2/3 cup sugar
1/4 teaspoon table salt
2 tablespoons unsweetened cocoa powder, divided  

Mocha Whipped Cream Frosting:
1 1/2 cups whipping cream
1/2 cup sugar
1/4 cup unsweetened cocoa powder
2 teaspoons vanilla
1 tablespoon instant espresso

Preheat oven to 350°F. Butter 10-by-15-inch shallow baking or jellyroll pan.  When I need to grease up a pan I use a sandwich bag that acts like a glove so I can easily cover the pan and get into all the corners with my fingers.
 

 Line the bottom lengthwise with a piece of waxed paper that extends up the short sides one inch.  Grease the wax paper.


Melt chocolate with water or coffee in a small saucepan over very low heat until it is 75 percent melted. Remove from heat and stir until the remaining chocolate is smooth. Set aside to cool slightly.  Beat egg yolks with an electric mixer until pale and creamy.  Add sugar gradually, and continue to beat until yolks are pale and ribbony.


Gently stir the chocolate into the yolk mixture.


In a clean bowl with clean beaters, beat egg whites with salt until they hold stiff peaks.  However mine looks like scrambled egg whites.  Yours will look much better.


Stir 1/4 of egg white mixture into the chocolate-yolk mixture to lighten it.


Fold the remaining whites into the cake batter in three additions. Pour batter into prepared pan and smooth top.


Bake in preheated oven for 15 minutes, or until cake layer feels dry (but very soft) to the touch and a toothpick inserted into the center comes out clean. It will still seem a little under baked.  Transfer to a cooling rack and cover the top with a light damp towel or two layers of damp paper towels for 10 minutes.


Gently remove towel. Run a knife around the edges of the cake to help loosen from the pan. Sift one tablespoon cocoa over the top of the cake and cover the cake with a thin tea that is a little longer than the pan. Place the back of a baking sheet or a large flat tray over the towel and invert the cake and paper onto it. Gently peel back the parchment or waxed paper that lined the pan.


Sift the remaining tablespoon of cocoa powder over the top of the cake. Using the towel underneath to help lift and roll the cake, roll the cake from short end to short end with the towel inside.  Let cool completely, encased in its towel.


To prepare the whipped cream, combine all ingredients in a bowl with an electric mixer until thick and forms peaks.  Do not over beat.


Make sure you have your serving platter nearby as things get tricky at this point.  Gently unroll chocolate cake and remove tea towel.  Another mistake I made is that I didn't unroll the cake onto a piece of wax paper, and instead directly laid it onto the counter (see below).  Having a piece of waxed paper underneath would have helped SO much for this step.  Additionally the cake was a bit sticky so some stuck to the counter as well, what a delicious disaster.  Spread your whipped cream filling evenly over the cake.  I used a metal spatula and it worked beautifully.


Gently use waxed paper once again to re-roll cake. Place on serving platter, seam side down.


  can you hear me cursing in this picture


No, this is not a piece of driftwood.


At this point I decided it was best to help my train-wreck-of-a-cake look as good as it tasted.  Time to add ganache.  A lot.  To fill in the 'cracks.'  The buche turned out to be ganache with a side of cake, but it doesn't matter.  We enjoyed eating it anyway. 

Ganache: 
6 ounces semisweet chocolate, finely chopped (or 1 cup semi-sweet chocolate chips)
6 tablespoons heavy cream
3 Tablespoons unsalted butter 

Place chopped chocolate in a small bowl. Set aside.  In a small saucepan, heat the butter and cream over medium heat, stirring constantly. When mixture is almost boiling, pour over the chocolate. Let stand for 30 seconds.


Stir until smooth.  Pour ganache over cooled cake and let it run down the sides.  Be sure to not let the ganche cool too much or it will become thick and you'll have big puddles like I did.


Happy Holidays!

cake recipe courtesy of Smitten Kitchen

Dec 16, 2011

The LAST chocolate chip cookie recipe you'll ever need.

The chocolate chip cookie holds a special place in my heart.  It was the first recipe I learned to make from scratch.  I'll never forget in the fourth grade we had an open house at our school and were assigned do some sort of science experiment.  You know what I'm talking about, some kids did the volcano with dry ice, others did the solar system with those styrofoam balls painted to look like the planets, and well me, I baked chocolate chip cookies.  My angle of how this was related to science was to describe the chemical reaction that took place from the addition of baking soda and baking powder, aka the leavening agents that make the cookies rise in the oven.  Genius, I know.  So we had to stand next to our science experiments and the guests were free to walk around and view what gluey little messes we prepared.  I had a big poster behind me that had my cookie recipe written on it along with all the 'research' I did.  And in front of me I had a big plate of my cookies that I prepared all by myself, yep so proud.  So I'm standing there smiling as people walk by thinking how unique my project was compared to all the other kids, then it started happening.  People (mostly sticky bratty little noise-makers) would come up to my stand, take a cookie and walk away.  No 'oh what is this all about' or 'oh isn't that clever.'  Nope, not a word, not a glance at my special poster, nada.  They just took a cookie and bolted…like I was the refreshments table.  Yeh I was crushed, but I got an A. 

I was debating on whether or not to post this recipe because come on we all know how to bake chocolate chip cookies, right?  BUT, this is not just any chocolate chip cookie recipe.  This is THE chocolate chip cookie recipe.  I've tried the notorious Neiman Marcus one (here), it's good.  I've also tried the infamous Jacques Torres recipe (here) which is awesome, but getting his chocolate to Dubai isn't that easy and really what's the point of baking them without the chocolate 'oh I'm in heaven' discs.  So forget what you know about chocolate chip cookies and try this recipe.  It's simple to throw together and most probably you have all of the  ingredients in your pantry.  Don't we all have stock of chocolate chips or is that just me?   

The key to this recipe is the amount of brown sugar (1 cup), the extra egg    yolk,and an oven temperature set to 325 (Fahrenheit).  This combination provides the chewiness and soft texture.  The only problem with these cookies is you'll want to eat all the batter and not bake them, it's that good.  Be sure to store in an air-tight container (and not a cookie jar) to avoid them from hardening.  I usually freeze half the batch so we can enjoy them later and they defrost beautifully as well.  I usually first wrap in plastic wrap, then aluminum foil, then place in a zip-lock freezer bag.  It's like Fort Knox in my freezer.


Ingredients

2 cups all-purpose flour
1/2 teaspoon baking soda
1/2 teaspoon salt
3/4 cup unsalted butter, melted
1 cup packed brown sugar
1/2 cup white sugar
1 tablespoon vanilla extract
1 egg (room temperature)
1 egg yolk (room temperature)
2 cups semisweet chocolate chips
1 cup chopped walnuts (optional)

Directions

Preheat the oven to 325 degrees F (165 degrees C). Grease cookie sheets or line with parchment paper.

Sift together the flour, baking soda and salt; set aside.


In Dubai butter is sold in grams, not 1/2 cup sticks like we have in the US, so measuring butter gets quite tedious.  I had to eye-ball an amount from the block and melt it, then pour it in a measuring cup to get 3/4 cups exactly.

   
In a medium bowl, cream together the melted butter, brown sugar and white sugar until well blended.

Beat in the vanilla, egg, and egg yolk until light and creamy.  Please take notice that I cracked the egg in a separate bowl before adding to the sugar/butter mixture.  I do this with ALL my recipes.  It doesn't matter whether it's cookies, cakes, muffins, whatever.  This is done for two reasons.  First, I believe you if you think you are the master egg-cracker BUT sometimes teeny-tiny pieces of egg shell can slip in and hide themselves in your bowl.  Second, let's face it, sometimes you can get a bad egg, and that is just gross.  So, on the side of caution, crack separately.

   
Mix in the sifted ingredients in one-third increments until just blended.  Never dump your dry ingredients in all at once.  First, you're just going to make a mess once that mixer is turned on.  Second, and more important by adding the dry ingredients gradually you ensure that they will be incorporated evenly.  Never over mix as this can active the gluten from the flour and cause your cookies to become tough.  This goes for almost all cookie recipes, cakes, breads, etc.

(and don't forget to scrape down the sides of your bowl)
 Stir in the chocolate chips and walnuts by hand using a wooden spoon.  Place dough in the refrigerator for 1 hour.  Because the butter in this recipe is melted the cookies can spread in the oven and become too flat if you don't let the dough firm up.  Drop cookie dough  onto the prepared cookie sheets. Cookies should be about 2 inches apart.

Bake for 15 minutes in the preheated oven, or until the edges are lightly toasted.  Cool on baking sheets for a few minutes before transferring to wire racks to cool completely.

Adapted from allrecipes